 Networking
The main network connection manager is Network Tool (forked from wpa_gui). The auxiliary connection manager is Network Setup.
Network Tool
Network Tool supports wireless and wired connections.
Click its panel icon ![]() to set up connections.
If connections need your attention the icon could
look like this:
to set up connections.
If connections need your attention the icon could
look like this: ![]()
Right click to restart the
connection. ![]()
Connect to Wireless Networks (Network tool Wifi tab)
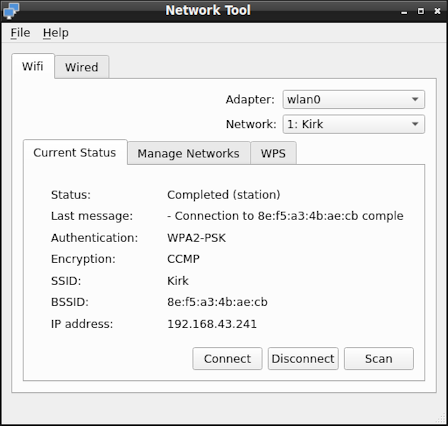
The Network Tool automatically connects to one of the enabled network profiles listed in the Manage Networks sub-tab.
Press the Scan button to discover which networks are
available in your current location. Add new network
profiles to the Manage Networks sub-tab as explained
below.
To add a new profile and connect to the network:
- If your computer has multiple wireless adapters, Network Tool can only connect using one wireless adapter at the time. Select which one from the Adapter pull-down. See also: Wireless Antenna Manager.
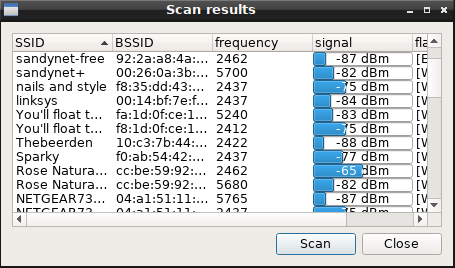
- Click Scan to open the Scan results window. Click the Scan button if needed to refresh results. You might have to wait several seconds for your network to show.
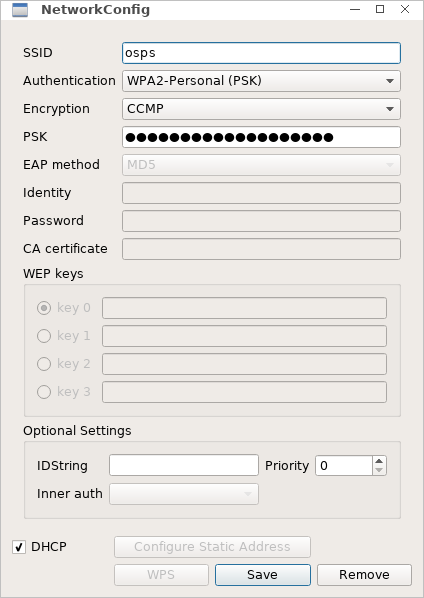
- Select and double click the network SSID of your network.
- Select the authentication method appropriate for your network, and type all required credentials. For WPA2-Personal authentication the password goes into the PSK field.
- Enable the DHCP field to receive an automatic network address. If you prefer to configure a static address disable the DHCP field and press Configure Static Address (see Configuring a Static Address for further instructions).
- Press Add to add the new profile to the Manage Networks sub-tab. Click Save Configuration in the File menu to save for the next reboot.
- On the Current Status sub-tab, you should see a connection being made to your newly added profile unless the Network Tool has already connected to another network. To manually select a network, use the Network pull-down and press Connect.
Tips:
- To always connect to a specific network disable other networks in the Manage Networks sub-tab.
- The Flags column (Scan results window) shows the authentication and encryption methods that the selected network supports.
- If [WPS] is shown you may also use the WPS tab to connect with your network Access Point (AP) without a password. Refer to your AP manufacturer's documentation.
Configuring a Static Address
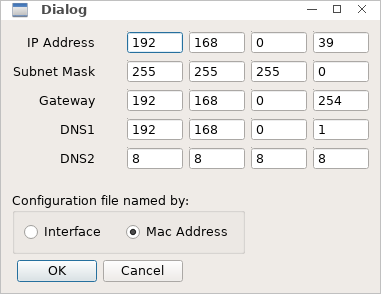
When you disable DHCP in the Wifi (or Wired) tab you come to this dialog to set a static address. The dialog guesses reasonable defaults for a simple home LAN setup. For more advanced configurations, and for troubleshooting issues, you will need to read up what each parameter really does. Getting static addressing right needs some experience.
- Enter IP address, Subnet Mask and Gateway.
- Enter DNS1 address and optionally DNS2. The default values set Google's DNS servers. You may want to replace these with your ISP's DNS server addresses.
- Select a save method for the new configuration. You can always change the save method later. Choose Interface to tie the static address to your interface name, like wlan0 or eth0. This is recommended if you run Fatdog64 on the same system all the time, like your notebook or desktop system. Choose Mac Address otherwise, for instance, if you carry Fatdog64 on a USB flash key, and boot several systems in different network environments with it.
Tips:
- Configuration files for static addresses are located in
directory
/etc/wpa_gui. - Unlike an Interface name, the Mac Address uniquely identifies a network adapter. The interface name (wlan0, wlan1, eth0, and even longer names), is unique within the same computer, but will likely clash if re-used for multiple computers.
- Linux assigns and remembers Interface names automatically. Sometimes it can be useful to clear all saved names and force Linux to start assigning them again. This can be done from the Network Setup Troubleshooting menu. If you do this, you will need to reconfigure static addresses.
- Optionally, by editing file
/etc/resolv.conf.headyou can add DNS servers that take precedence over the servers configured with the Network Tool. Both server sets are enabled, but the latter is used only when the former isn't available. Here is a sampleresolv.conf.head:# static DNS.WATCH nameservers for privacy nameserver 84.200.69.80 nameserver 84.200.70.40 # end of /etc/resolv.conf.head
Connect to Wired Networks (Network Tool Wired tab)
A wired connection hooks up your computer to your home network router with an Ethernet cable.
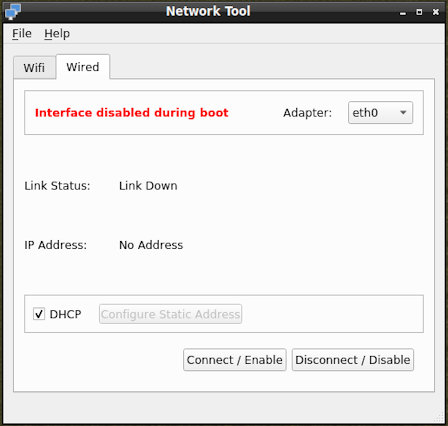
- If your computer has multiple wired adapters, the Network Tool can only connect using one wired adapter at the time. Select which one from the Adapter pull-down.
- Enable the DHCP field to receive an automatic network address. If you need to configure a static address disable the DHCP field and press Configure Static Address (review Configuring a Static Address).
- Link Status should be "up". If it isn't either the network cable is not connected, Fatdog64 is still busy starting network services, or the adapter isn't properly installed or configured at boot time.
- Press Connect/Enable and watch the red "Interface disabled during boot" line change to a green "Interface enabled during boot" line. This refers to the next time you will boot the system. Also, the current session is connected via the wired adapter.
Restarting the Connection
If you have problems connecting to a network, right click the Network Tool icon and select Restart Connection. This action will restart wireless network services.
If the Network Tool manages your wired connection, this action will also restart wired network services. (The other way to manage wired connections is Network Setup).
When the Network Tool is left free to automatically select the best network, it will do so based on the order of network entries in the Manage Networks sub-tab, their network security level (WPA/WPA2 is preferred), and signal strength. Network entries are saved to the configuration file.
Configuration file: /etc/wpa_supplicant.conf.
Wireless services: wpa_supplicant, wpa_cli, dhcpcd.
Wired services: dhcpcd.
Wireless
Antenna Manager
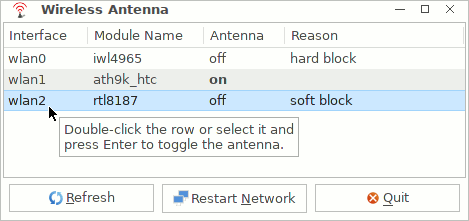
The Wireless Antenna Manager applet can be started from the Control Panel Network tab.
It can be used to temporarily enable/disable the antenna of a wireless adapter. This can help in troubleshooting network connections for computers equipped with multiple wireless adapters.
Network Setup
Network Setup can be used to connect wired and wireless networks in a way that is independent of Network Tool.
For ease of use and breadth of features most users should prefer Network Tool over Network Setup, which still provides some unique features. Most prominently, the ability to set up network connections without running Xorg. Network Setup uses text-based dialogs that work for both the system console (no Xorg), and a terminal window (Xorg).
For the system console, start Network Setup with command network-setup.sh.
For Xorg start the Network Setup applet from the Control Panel
Network tab.
To navigate the dialog use the Up and Down arrow keys to hightlight a menu entry, the Enter key to activate it, the Tab and Shift Tab keys to cycle across the input fields and the buttons, and the Esc key to go back one level.
Connect to Wireless Networks with Network Setup
You can configure a static or automatic (DHCP) address for your wireless (wlan0) adapter.
The concepts and actions that are involved are similar to those for Network Tool, where they are explained in more detail.
To add a new profile and connect to the network:
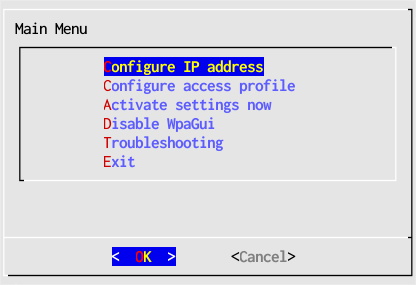
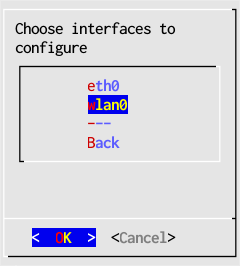
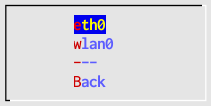
- In the main window select Configure IP address then choose the interface adapter to configure, wlan0 in this example, but the actual name may be different for your computer.
- Select Auto-configure using DHCP, and acknowledge the confirmation window. If you prefer to configure a fixed IP address select instead Use static IP (see Configuring a Static Address with Network Setup for further instructions).
- Go Back to the main window.
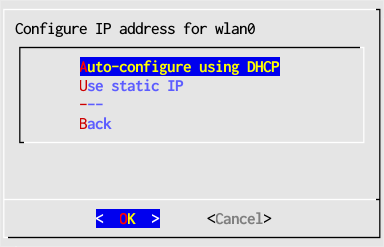
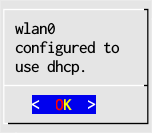
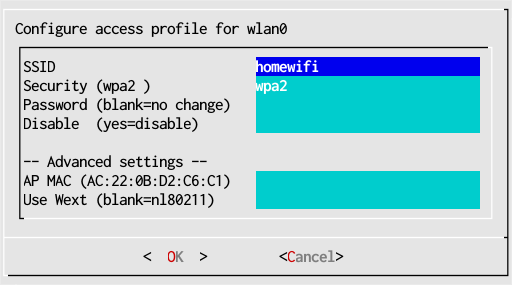
- In the main window select Configure access profile then choose the same interface adapter, wlan0.
- Select New profile from existing networks. This will scan for available wireless networks.
- Select the name (SSID) of your wireless access point, "homewifi" in this example.
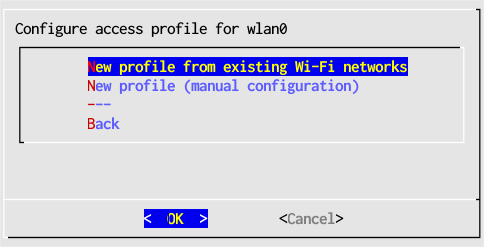

- The SSID and Security fields are automatically filled in. Normally you don't need to change them.
- Fill in the password for "homewifi" and press OK.
- Go back to the main window.
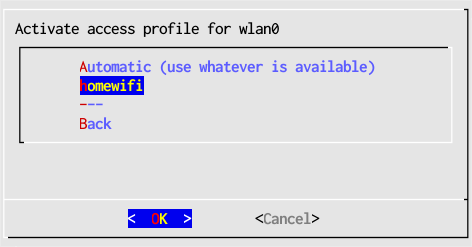
- In the main window select Activate settings now then choose the same interface adapter, wlan0.
- Select the name of the profile you want to activate. For wireless it is the SSID name.
Tips:
- Network Setup saves configurations under directory
/etc/network-setup
Configuring a Static Address with Network Setup
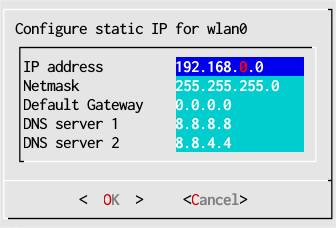
When you select "Use static IP" in step #2 above you come to this dialog to set a static address.
- Enter IP address, Netmask and Default Gateway.
- Enter DNS server 1 and optionally DNS server 2. The default values set Google's DNS servers. You may want to replace these with your ISP's DNS server addresses.
- Press OK to save the configuration for your interface name.
See also Configuring a Static Address for wireless networks for general information about static addresses.
Connect to Wired Networks with Network Setup
To add a new profile and connect to a wired network follow the instructions given for wireless networks, but select a wired interface (eth0). You will not need to scan for networks or to enter an access password.
Disable / Enable WpaGui
In the main window you can disable / enable Network Tool services. This applies at the next reboot and every reboot after, until Network Tool is enabled again from Network Setup.
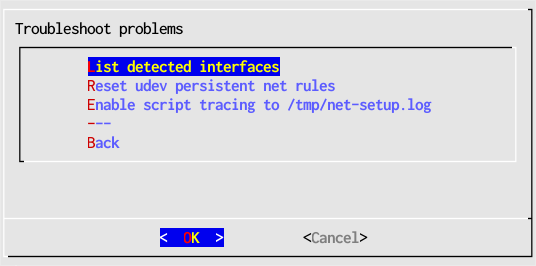
Troubleshooting Menu
"Reset udev persistent net rules" clears the interface names that Linux automatically assigns to network adapters. Then Fatdog64 will restart wired adapter names from "eth0" and wireless adapters from "wlan0". If you use this entry you will need to configure all static IP addresses again.
